Styles for Tooltip

Tooltips in Spotfire are great for showing insights on mouse over. We use them a lot for showing information which should appear only when we need. But what if you feel that their look and feel is not matching with you theme ?
Question here is - How to add Style to tooltips ? 🤔🤔
Answer is, below code in a HTML TextArea -
<style id="AlienBox">
 .sf-tooltip {
background-color:chocolate !important;
color: white !important;
border: 2px solid white!important;
border-radius: 8px 0px 8px 0px !important;
    font-variant: petite-caps;
    font-style: italic;
    font-weight: lighter;
    font-size: x-small;
}
 </style>
If you are victim of HTML Sanitization issue, use JavaScript below -
if(!$('#AlienBox').length){
 $('body').append($(`<style id="AlienBox">
 .sf-tooltip {
background-color:chocolate !important;
color: white !important;
border: 2px solid white!important;
border-radius: 8px 0px 8px 0px !important;
    font-variant: petite-caps;
    font-style: italic;
    font-weight: lighter;
    font-size: x-small;
}
 </style>`, {
        id: 'AlienBox' 
   })); 
}
This is what I was able to achieve so far -

Conditional Coloring of Spotfire Buttons

My friend was willing to color Spotfire Action buttons based on a value. 
It is a small but effective way of representation. You will actually come to know what are your expectations even before clicking on a color coded button.
Challenge here, This color should be picked automatically  
Challenge Accepted !
Lets Start -
  1. Create a calculated value or Label property which evaluates into a single color (e.g. red) or into a color code value (e.g. #454545). Enclose it is a span with id property-
    <span id='property' style="display:none">
       <SpotfireControl id="c281364f0af947c38752561b38be631e" />
    </span>
  2. Now enclose your action button inside another span with id ConditionalButtonColor like below. This way you are letting your code know - which button you are going to style 🧐
    <span id='ConditionalButtonColor'>
    <SpotfireControl id="edf0f3c8a1b945cb840cd0235fce8d66" />
    </span>
  3. Now you simply need this JavaScript code to be added to the text area. It retrieves value from property and set it a background color of action button inside ConditionalButtonColor .
    var flag=0
    function conditionalColor() {  
     colorValue=$("#property").text()
     if(flag!=colorValue){
      $('#ConditionalButtonColor .sfc-action-button').css({
        background:colorValue,
    color:"white"
        ,textAlign:"center"
        ,margin:"10px"
        ,padding:"5px"
        ,borderStyle:"outset"
        ,width:"100px"
      });
     }
      flag=colorValue
    }

    setInterval(conditionalColor,500)
  4. Save the text are and you are done ✅
For demonstration, I am updating color value a drop down property. You can update it via a Label Document Property, Calculated value or even from simple sting as well. Here is a screenshot with results -

Show/Hide Pages with a Button

A friend from Community asked for a Button to toggle visibility of a Spotfire page.  
So, this post is about same 😎
Lets Start -


  1. Create a button in TextArea with id Hider. If you are suffering from HTML Sanitization, you can use my alternative code. This one re-purposes span as button 😜
    <span id="Hider" style="background-color:chocolate;
    color:white;
    display:inline-block;
    border: 1px solid rgb(128,128,128);
    border-radius : 8px;
    padding     : 8px;
    line-height : 24px;
    text-shadow : 0 0 2px black;
    font-size:larger;
    margin:5px;
    cursor: pointer;">Toggle Visibility
    </span>
  2. Add below JavaScript to TextArea. Here [1] is page index of Second page. You can adjust it as you need.
    $('#Hider').click(function(){
    var state =$('.sf-element-page-tab')[1].style.display;
    console.log(state);
    if(state =='none') {
    $('.sf-element-page-tab')[1].style.display = "";}
    else{$('.sf-element-page-tab')[1].style.display = "none";}
    });
  3. Save TextArea and you are done ✅
This is a Before vs After comparison of Page Navigation Area -

Capturing Hierarchy Axis Changes to Document Property

My friend recently asked an Interesting Question -
I have a chart where I am using a Hierarchy as Category Axis. I want to capture changes in that Axis (Hierarchy) to a Property Control. Is there a way to do this ?
Sounds interesting  🙃
Well , Let's start doing it !
  1. Add a Input field property enclosed in a span like below. Code in red is optional based on whether you need to display document property on not.
    <span id='AxisTracker' style='display:none;'>
      <SpotfireControl id="635a7ae743a14feb865833e75f3e9b4d" />
    </span>
  2. Add below JavaScript to capture changes. Here code in red indicates the possible states of Hierarchy Axis of interest

    function updateProperty(){
    $('.sf-element-text-box').each(function(index){
    //console.log($(this).text());
    switch($(this).text()){
        case "Geo (Region)":
        case "Geo (State)":
        case "Geo (City)":
    console.log($(this).text());
    $('#AxisTracker input').val($(this).text()).blur()
    break;
    }
    });}
    setInterval(updateProperty,500)
  3. This is pretty much all 🤓 
Using this approach helps in tracking changes to the Axis and we can trigger IronPython code as well on Document property change. 

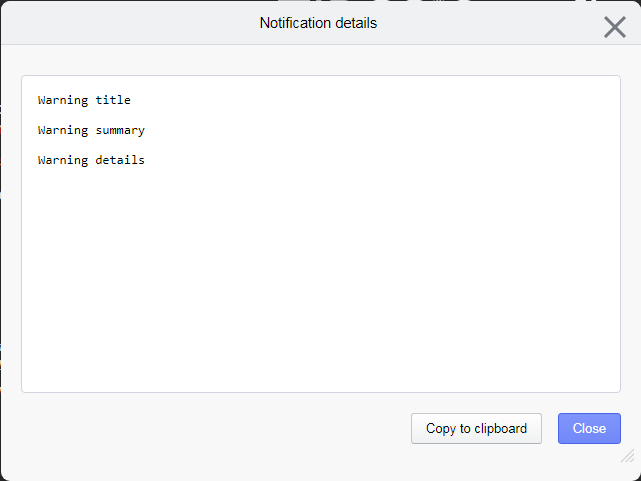
Adding some styles to Notifications

Default Notifications Dialog is boring!

Agree?
If yes, then this post is for you. Try Adding below code to a text area and then have a look at notifications again-
<style id="AlienBox">
.sf-modal-dialog-content textarea {
    color: azure;
    background-color: brown;
}
.sfc-default-theme.sf-element-modal-dialog .sf-element-modal-dialog-footer {
    font-size: 14.5px;
    background-color: #1e264e;
    color: #BDBFC3;

}
.sfc-default-theme.sf-element-modal-dialog .sf-element-modal-dialog-header {
    background-color: #134373;
}
.sfc-default-theme.sf-element-modal-dialog {
    background-color: #772323;
}
.sf-element-modal-dialog .sf-element-modal-dialog-header-title-text {
    font-size: x-large;
    color: blanchedalmond;
}
.sfc-default-theme.sf-element-modal-dialog .sf-element-modal-dialog-header .sf-element-modal-dialog-header-close {
    color: #ffffff;
    font-size: xx-large;
}
.sfc-default-theme.sf-element-modal-dialog .sf-element-button.sfpc-secondary {
    background-image: linear-gradient(to bottom, #7b3939, #206bb7);
    border-top-color: #234996;
    border-right-color: #4d6ba7;
    border-bottom-color: #AFB2B7;
    border-left-color: #586d96;
    border-bottom-color: #546580;
    color: #ffffff;
    font-size: large;
}
.sfc-default-theme.sf-element-modal-dialog .sf-element-button {
    background-image: linear-gradient(to bottom, #7b3939, #206bb7);
    border-top-color: #234996;
    border-right-color: #4d6ba7;
    border-bottom-color: #AFB2B7;
    border-left-color: #586d96;
    border-bottom-color: #546580;
    color: #ffffff;
    font-size: large;
}
</style>
For HTML Sanitization, I have a JavaScript code too -

if(!$('#AlienBox').length){
$('body').append($(`<style id="AlienBox">
.sf-modal-dialog-content textarea {
    color: azure;
    background-color: brown;
}
.sfc-default-theme.sf-element-modal-dialog .sf-element-modal-dialog-footer {
    font-size: 14.5px;
    background-color: #1e264e;
    color: #BDBFC3;

}
.sfc-default-theme.sf-element-modal-dialog .sf-element-modal-dialog-header {
    background-color: #134373;
}
.sfc-default-theme.sf-element-modal-dialog {
    background-color: #772323;
}
.sf-element-modal-dialog .sf-element-modal-dialog-header-title-text {
    font-size: x-large;
    color: blanchedalmond;
}
.sfc-default-theme.sf-element-modal-dialog .sf-element-modal-dialog-header .sf-element-modal-dialog-header-close {
    color: #ffffff;
    font-size: xx-large;
}
.sfc-default-theme.sf-element-modal-dialog .sf-element-button.sfpc-secondary {
    background-image: linear-gradient(to bottom, #7b3939, #206bb7);
    border-top-color: #234996;
    border-right-color: #4d6ba7;
    border-bottom-color: #AFB2B7;
    border-left-color: #586d96;
    border-bottom-color: #546580;
    color: #ffffff;
    font-size: large;
}
.sfc-default-theme.sf-element-modal-dialog .sf-element-button {
    background-image: linear-gradient(to bottom, #7b3939, #206bb7);
    border-top-color: #234996;
    border-right-color: #4d6ba7;
    border-bottom-color: #AFB2B7;
    border-left-color: #586d96;
    border-bottom-color: #546580;
    color: #ffffff;
    font-size: large;
}
</style>`, {
        id: 'AlienBox' 
   }));
}
This is what I got with my code -

Interacting with Subsets with IronPython

What if you have to compare All Data with current Selections (Marking, Filtering etc.) ?
What if you have to compare your two selections?

I know answer will be - using (Subsets).
But, What If you want to make this comparison on-Demand only ?

My Answer is below IronPython code -
from Spotfire.Dxp.Application.Visuals import *
vsc = v.As[VisualContent]().Data.Subsets
vsc.Clear()# To Clear all subsets except defaults
#Use below 2 rows if you need to add additional Subsets
#vsc.AddDataSelection(Document.Data.Markings["Marking Name"])
#vsc.AddDataSelection(Document.Data.Filterings["Filtering Scheme Name"])
for ss in vsc:
print ss.DisplayName,"\n\tEnabled ? ",ss.Enabled,"\n\tInteractive? ",ss.Interactive
if ss.DisplayName =='All data':#Toggle between one selection Enabled status
ss.Enabled = not ss.Enabled
ss.Interactive=False
With above code, we are expecting these results -

Adding Styles to Legend Area

Recently I have posted a few ways to style different Spotfire elements. Now I have one more, for Legends this time.
This is what I have been able to achieve so far -
Here is the code you need to Add to one of the HTML Text Area -
<style id="AlienBox">
.StyledScrollbar.LegendScroll {
    background-color: darkcyan;
    border: 2px solid darkmagenta;
    border-radius: 12px;
}
.sfc-style-root .sf-element-legend-item {
    padding-top: 1px;
    padding-right: 10px;
    padding-bottom: 6px;
    padding-left: 10px;
    background-color: blueviolet;
    border: 2px solid blue;
    border-radius: 12px;
}
.sf-element.sf-element-title.sf-legend-item-elem {
    background-color: darkblue;
    border-radius: 12px;
}
.sf-element-document .sf-element-axis-tray .sf-element-text-box {
    vertical-align: top;
    color: deepskyblue;
    font-weight: bold;
    font-size: x-small;
}
.sf-element.sf-element-sub-item-section.sf-legend-item-elem {
    font-variant: petite-caps;
    font-style: italic;
    font-weight: lighter;
    font-size: x-small;
}
</style>
For HTML Sanitization issue, we have a solution as always as a JavaScript code -
if(!$('#AlienBox').length){
$('body').append($(`<style id="AlienBox">
.StyledScrollbar.LegendScroll {
    background-color: darkcyan;
    border: 2px solid darkmagenta;
    border-radius: 12px;
}
.sfc-style-root .sf-element-legend-item {
    padding-top: 1px;
    padding-right: 10px;
    padding-bottom: 6px;
    padding-left: 10px;
    background-color: blueviolet;
    border: 2px solid blue;
    border-radius: 12px;
}
.sf-element.sf-element-title.sf-legend-item-elem {
    background-color: darkblue;
    border-radius: 12px;
}
.sf-element-document .sf-element-axis-tray .sf-element-text-box {
    vertical-align: top;
    color: deepskyblue;
    font-weight: bold;
    font-size: x-small;
}
.sf-element.sf-element-sub-item-section.sf-legend-item-elem {
    font-variant: petite-caps;
    font-style: italic;
    font-weight: lighter;
    font-size: x-small;
}
</style>`, {
        id: 'AlienBox' 
   }));
}

Display Current User Information on Menu Bar

I recently posted about how to add Information to Menu Bar . I have been asked on LinkedIn - "How to display Current Logged in Username here ?"
I will not say it is difficult, but involves a little more number of steps, because we have to use some extra steps to get current user details as well.
So, Lets Start !
  1. Create 2 Document Properties time and UserName . We will use time to trigger a IronPython Script to get current user details.
  2. Add script to Document Property time .
    You can use any script to get user information. I used approach from my post on LinkedIn-
    from Spotfire.Dxp.Framework.ApplicationModel import UserContext
    r=Application.GetService[UserContext]()
    Document.Properties["UserName"] = r.Username
  3. Now, create a Data Function with Simple script.
    output=input
  4. Define Output Parameter to Document Property time to trigger IronPython code from step 2.
  5. Define Input Parameter to expression below-
    String(DateTimeNow())
  6. In HTML Text Area, create a Div with Property User enclosed -
    <span id='userDet' style="visibility:hidden;">
    <SpotfireControl id="52ea70f998bb46c985e49a1d0ca03ada" />
    </span>
  7. Add JavaScript for final touch-
    if(!$('#AlienBox').length){
     $('body').append($(`<style id="AlienBox">
     #Brand {
        position: absolute;
        top: 0px;
        right: 40%;
        height: 30px;
        width: 100px;
        z-index: 99;
        border: 1px solid chocolate;
        border-radius :5px;
        color:chocolate;
    }
     </style>`, {
            id: 'AlienBox' 
       })); 
    }
    innerHTML=`<div id="Brand">
     <center> Current User is <br><b>`;
    innerHTML+=$("#userDet").text();
    innerHTML+=`</b> </center>
     </div>`;

    if(!$('#Brand').length){
     $('body').append($(innerHTML, {
            id: 'Brand' 
       })); 
    }
  8. Save the Analysis and Close.
  9. Open Analysis again to see the desired output.
I am not including any screenshot this time, Just give a try and see the results yourself.